Sof Bread Recipes – Rye Bread & Challah
Baking Rye Bread
January 16, 2021
By Arnie Warshawsky
Living under self-quarantine is an exercise in frustration. What to do, what to do. Funny how doing nothing more strenuous than using the TV remote or the computer mouse makes me hungry. Lately, I’ve hungered for toast with marmalade and a cup of coffee for breakfast. At lunch time a nice sandwich often hits the spot. And a nice slice of fresh bread pairs well with dinner. The only problem is ensuring a decent supply of tasty bread.
Now our home usually has plenty of fresh-baked challah, thanks to Peter Fritz’ excellent class. I’ve made challah so much I probably don’t need to refer to the recipe anymore. And best, it comes out just right each time. But as good as the challah is, sometimes I get a hankering for a nice slice of rye bread. Now I was raised in New York City. While growing up, there was never a scarcity of good, fresh Jewish rye bread. My mom and I would go to the town bakery and buy our loaf. Seeded or unseeded? That was the first question. Sliced or no? That was the second. I remember watching the salesgirl put our loaf on the slicer, push a button and the machine chugged its way through the loaf perfectly slicing the entire loaf in one pass. It was fascinating to watch. Hard to find that experience anywhere these days, yet alone here in Hawaiʻi. So I decided to expand my horizon, so to speak, from the challah baking that Peter taught to making Jewish rye bread. Well, I’m not here to tell you that I succeeded with Jewish rye bread. But I have succeeded in making a pretty good classic rye bread. The recipes I’ve found for Jewish rye call for pickle juice mixed in with the dough. I’ll try that eventually, just not yet.
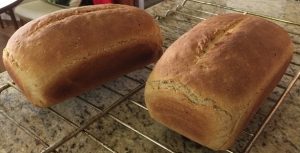
The above picture shows today’s loaves fresh from the oven and cooling on a wire rack. The taste and texture are classic rye and are a welcome addition to my growing repertoire of baked goods. So here is my recipe for this rye bread. I started with a recipe for “Classic Rye Bread” I found on-line. It didn’t work out so well, so I changed ingredient amounts, added sugar for the yeast, and modified baking times. I use a stand mixer to knead the dough and double the below recipe to get two loaves, which takes about the same effort as baking a single loaf. Peter drilled us to use weight instead of volume for measurements. That makes for better repeatability because weights on a scale are exact, while volume measurements are not consistent. For example, one level tablespoon of table salt weighs more than the level tablespoon of Kosher salt. The reason why has to do with the size of the salt crystals. Without further ado, here is my rye bread recipe; it yields a single 2-pound loaf.
Ingredients:
- 400 grams white flour
- 230 grams rye flour
- 340 grams warm water (approx. 110 deg)
- 6 grams active dry yeast (approx. 2 tsp)
- 7 grams caraway seeds (approx. 1 tbsp)
- 10 grams salt
- 1 tsp (or so) of sugar
Directions
- Combine the yeast, sugar, and water. Set it aside to let it generate a foamed head.
- Combine the flour, salt, and caraway seeds in the stand mixer. Switching to a dough hook, slowly pour in the foamy yeast/water mixture. Knead for about ten minutes, or until the dough ball pulls away cleanly from the side of the mixer bowl. Add more flour if the dough is too sticky, add small amounts of water if the dough is too dry.
- Remove the dough hook, cover the bowl with a towel, and let the dough rise inside the mixer bowl until doubled in volume. This takes me about two hours and can take as long as four hours. Be patient.
- Turn the dough onto a floured kneading board and knead a little more to force out bubbles. Then shape it into a rectangle about an inch thick on the kneading board. Cover it with a towel and let it rest for ten minutes.
- While the dough is resting, prepare your baking pan. Cut out four corners from a sheet of parchment paper (available in most grocery stores) so that it will fit neatly inside the loaf pan.
- Shape the dough: Starting at the top of the rectangle, fold the dough over on itself and pound it down. Keep folding and pounding until you get a squat, cylindrical shape. Roll the cylinder of dough back and forth a few times.
- Put the dough inside the loaf pan; keep the seam at the bottom. Cover with a towel and let it rise another hour.
- Put an oven-safe dish of water (I use a small stainless steel bowl) on the oven bottom. Preheat the oven to 450 degrees.
- After the second rise is done, use a sharp knife to slash down the top lengthwise. Place the loaf pan inside the oven and bake for 25 minutes. Now turn the oven heat down to 375 degrees and continue baking for another 15 minutes. Remove the loaf and check the inside temperature using a probe, You want the internal temperature to reach 200 degrees. If it is not yet 200 degrees, back into the oven for another 2-3 minutes, repeating the temperature check until you reach 200 degrees.
- Turn the loaf out of the baking pan and let it cool on a rack.
A couple of last words about finding ingredients these days. I use Red Star brand yeast, which I buy on Amazon. I get the two-pound size. It took a little over a month for the yeast to arrive, so plan accordingly. I buy my bread flour at Costco. While I prefer the 25-pound bag, lately the only size available is a 50-pound bag. A bit challenging to manhandle and to store, but having that much flour inspires me to bake more. I buy rye flour at Down to Earth in Kailua, but I’m sure there are other stores that carry it. Finally, I found that the only economical source for caraway seeds was Amazon. I bought a one-pound bag for a little over $10.
Challah Recipe
November 29, 2020
By Celia Diamond
Previously in Divine Kosher Cuisine, cookbook of Congregation Agudat Achim, Schenectady, NY, ©2006
Ingredients 
| • 8 cups flour
• ¼ cup sugar • 1 (scant) Tablespoon salt • 4½ teaspoons dry yeast • 1½ cups hot water (between 115° F – 130° F.) |
• ½ cup vegetable oil
• 4 large eggs, beaten (reserve 2 Tablespoons to brush on loaves after shaping) • (Optional) Sesame seeds or poppy seeds |
Oven 350° F
Instructions
To prepare by hand:
- Combine flour with sugar, salt, and yeast in a large bowl.
- Whisk eggs (minus the reserved 2 Tablespoons) with oil and add to flour mixture.
- Add hot water. Mix with spoon or hands until dough is stiff and not too wet to handle (add a little flour if necessary here or while kneading).
- Turn out on floured counter or board and knead 10 minutes or until dough is smooth, elastic, and cleans board or counter.
- Place dough in large lightly oiled bowl, turning once to coat.
- Cover with a damp towel and let rise in a warm place until double in bulk, about 1 hour.
- Dough is ready when indentation remains after touching.
- Punch down, place on lightly floured surface and divide in half.
- Divide one half into thirds and roll each third into a rope, keeping the middle thicker and tapering each end.
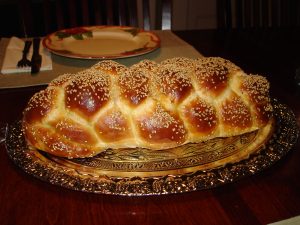
- Braid to form loaf; tuck ends under slightly and pinch to close.
- Place loaf on greased baking sheet (or one lined with parchment paper).
- Repeat with second half of dough.
- Mix 1/2 teaspoon water into reserved 2 Tablespoons of beaten egg.
- Brush on loaves and sprinkle with sesame or poppy seeds if desired.
- Let rise 1 hour.
- Preheat oven to 350° F.
- Bake 30 minutes or till crust is browned.
- Place loaves on cooling rack.
Using food processor:
- If processor bowl is normal size, prepare half of dough at a time.
- Place 4 cups of flour and half of each other dry ingredient in processor bowl and process a bit, till mixed.
- Remove cover insert and, with processor running, add mixture of 2 whisked-together eggs and ¼ cup oil, then ¾ cup of hot water, through hole in top.
- Continue processing 1 and a half minutes to knead (dough will start to clear sides of bowl toward end of this step).
- Turn out onto floured surface and repeat with other half of ingredients.
- Turn out atop first half of dough and knead together by hand a couple of minutes, till dough is a single lump that doesn’t stick to surface.
- Continue as above with rising, shaping, and baking.
Notes:
I always use my food processor – faster & easier.
Older bread recipes call for “proofing” the yeast in warm water before using. With modern, powdered dry yeast, this step is not necessary. Just add to other dry ingredients as above.
I use 6 cups of white all-purpose flour and 2 cups of whole-wheat flour (3 white and 1 white whole-wheat in each stage of food processor method). You can experiment with a larger proportion of (white or brown) whole-wheat flour, but I find the bread doesn’t rise as well with more than 3-to-1.
After turning dough over in oiled bowl before first rising, I brush just a little more oil on top to make sure it doesn’t crack while rising. (For “brush,” I use my fingers! I find a pastry brush catches and pulls the dough.)